skip to main |
skip to sidebar
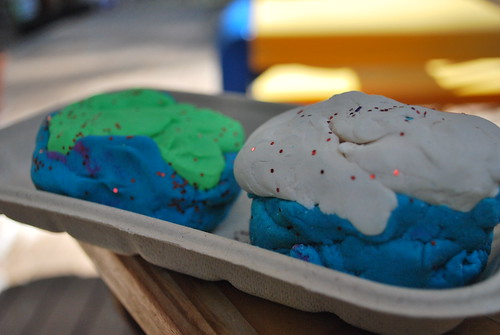
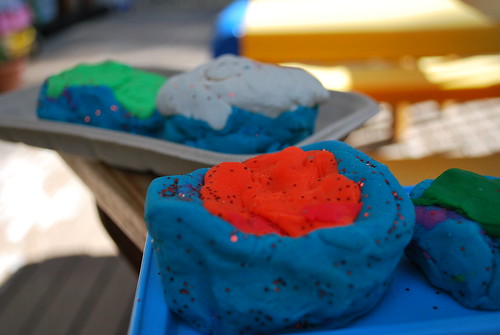
Colored Playdough:1 cup water1 Tbsp vegetable oil1/2 cup salt1 Tbsp cream of tartarfood coloring1 cup flourCombine water, oil, salt, cream of tartar, and food coloring in a saucepan and heat until warm. Remove from heat and add flour. Stir, then knead until smooth. Store in an airtight container.
Tip: I always find that this needs more flour than it calls for - I add 1 cup at first, and then add flour a little at a time until it's the consistency that I like. I've also found that you can skip putting it in a saucepan if you want - you can throw everything (but the water) into a large pyrex measuring container, and add boiling water. Also - if you want red - forget it. Adding red food coloring to white flour makes pink. And if you use whole wheat flour (I've done this...), it completely throws the color off. Of course, you would probably figure that one out before you tried it. Also also, if you use organic flour (ahem...I've done this as well), the resulting play dough will be really expensive. But organic.

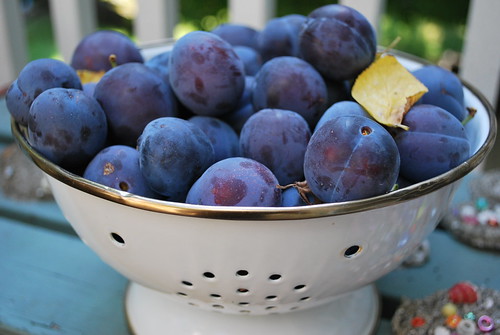
I admit, when my husband is out of town, I rarely cook. I used to try, just to keep meal times normal for my daughter - but it was usually a study in frustration. I mean, who wants to spend an hour in the kitchen making a full, healthy dinner, only to have the only other diner refuse to eat? Although that didn't always happen, it happened enough that I learned my lesson. Now it's all about quick food, and I don't even try to make the same thing for her as I do for myself. I make myself a nice big fresh salad with all the trimmings, and I make her something that I'm fairly sure she will like. I mean, I could put some salad in front of her, but I already know what will happen (she won't even eat with it on her plate), so what would be the point? I always offer her a bite of mine, and she always refuses. Tonight was such a night - and I'm sure glad I didn't spend a bunch of time trying out a new recipe or making a casserole, because she didn't even touch her grilled cheese sandwich. Or mango. Or tomato soup. In fact, I'm pretty sure she didn't eat anything. I'm not completely sure, because I was too busy enjoying my beautiful salad - a nice organic salad mix, avocado, apricots, feta cheese, teriyaki tofu - and a yummy home made simple salad dressing made with Trader Joe's Orange Muscat Champagne Vinegar (which is, I think, the key ingredient...) MMMMmmmmm. And after, I enjoyed some plum crisp, made with plums from my friends backyard. Picky didn't even go for this - something in the air? I hope she's not getting sick...
 My favorite crisp recipe at the moment is from Vegetarian Cooking for Everyone by Deborah Madison. I don't really follow a recipe for the fruit - you need about 3 lbs or 6 cups of fruit, and the amount of sugar varies with the sweetness of the fruit. For apples, I add a squeeze of lemon, 2 tbsp sugar, and 1 tsp cinnamon. For other fruits, I just add sugar, between 2 tbsp and 1/2 cup, to taste. I've tried adding either flour or corn starch as a thickener for fruit other than apples (which don't seem to need it) - I tried 2 tbsp corn starch tonight, but it was a little weirdly creamy - I think I prefer it runny, honestly. Perhaps I'll try instant tapioca, I think they use that in pie recipes sometimes. Anyway, the recipe is really the topping:
Crisp Topping
- 6 Tbsp canola oil (you can use butter - I find oil easier to work with)
- 3/4 cup brown sugar, packed
- 2/3 cup flour
- 1/2 cup rolled oats or chopped nuts (I almost always use oats, although almonds would also be good)
- 1/4 tsp salt
- 1/2 tsp grated nutmeg
- 1 tsp ground cinnamon, optional
You can also use a nut oil, such as walnut or hazelnut, for some or all of the oil - I haven't tried this, but it sounds good, especially if you're using nuts instead of oats. Anyway, all you have to do is combine the ingredients (if you're using butter, use your fingers to work the butter with the rest of the ingredients so that each piece is coated and you have a coarse, crumbly mixture). Spread the topping over a shallow gratin dish with your fruit mixture. Put the gratin dish on a cookie sheet (unless you just love to clean your oven), and put it in a preheated 375 degree oven. The recipe says 1 hour, 10 minutes, but I've always found 1 hour to be plenty. Plus, I usually have to loosly cover the dish with tinfoil about half way through or else the oats start to burn.
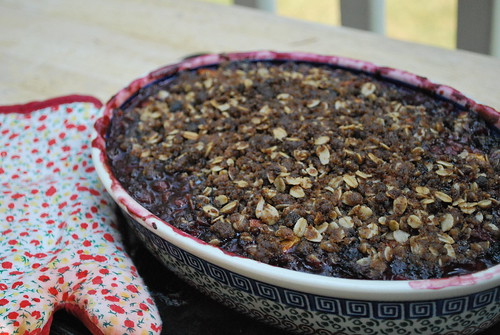
Although Picky didn't eat any of my plum crisp tonight, I know she'll enjoy some in the morning. I always eat a generous scoop with (plain) yogurt. Picky prefers the crisp alone, and likes the topping more than the filling (naturally). I think we enjoy it for breakfast more than dessert.
Tip: try combining fruits, or adding dried fruit. I put a handful of dried cranberries in tonights crisp - last week I made a delicious crisp with a little of everything from my CSA box: apricots, peaches, plums, and a can of blackberries that I had gathering dust in my pantry. oh yummy! My apple trees are promising many versions of apple crisp this fall! :)

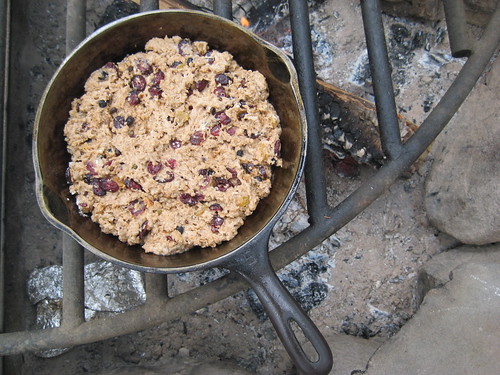
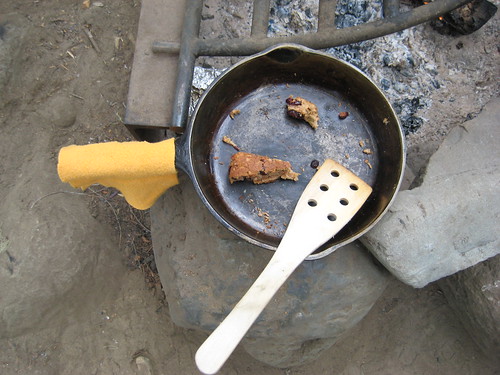
We just got back from camping - the highlight (food-wise) was definitely the bannock. I got the idea from another blog called Under the High Chair - I had never actually heard of bannock before, but liked the description (as a sort-of scone cooked over the fire), and so I started to search on the web for a good recipe. I found one that looked good (there are many, all variations on flour, baking powder, fat, liquid...) and I would give you a link, except that I didn't save it, and it didn't print out with the recipe. Sooo, I'll just copy the recipe here:
Cinnamon Bannock Delight
- 1 1/2 cups unbleached white flour
- 1 round tsp fresh baking powder
- 1/4 tsp salt
- 2 tbsp brown sugar
- 1 tbsp lard (I actually used "butter" - I mean the fake whipped butter)
- 2 rounded tbsp powdered milk
- 2 tsp cinnamon
- 1 handful raisins (I used a mix of raisins, cranberry raisins, and currants - and I'm sure I used more than one handful...
Mix all of the dry ingredients before hand and put them in a plastic bag for storage.
Make sure you bring a good cast iron pan to cook this over the fire.
At the campsite, warm about a cup of water.
The recipe said to mix the lard with the brown sugar, and add it to the rest of the ingredients (except the raisins), but I didn't do this - I had the sugar already in the dry stuff - the only problem with this is that the brown sugar started to clump up, and I had to hit the bag with a mallet to break up the clumps before I went on with the recipe - perhaps if I had added the brown sugar and "butter" together as the recipe suggested, this wouldn't have happened.... After you cut the butter (and sugar) into the dry ingredients (just use your fingers to mix it until it looks like oatmeal and seems to be thoroughly mixed), add the raisins. Then add a bit of the warm water and mix. Add a little more water, mixing thoroughly after each addition, trying not to add too much. As soon as the dough forms a ball, stop adding water - you don't want it to be too sticky. Form the stiff dough into a ball, and set the pot near the fire, where the dough will stay warm and rise. Allow 10 minutes for rising.
The recipe said that you should be cooking on embers, so you should add a few small logs at the start of the rising, and they would be ready for the pan after 10 minutes of rising - I think they must have meant if you were putting the pan directly on the embers - I put the pan on a grill over the fire, and found that embers weren't hot enough, and that a bit of a fire was needed for the right texture, and to cook it all the way through.
Remove dough from pot and place into a greased pan (I just used spray oil in my cast iron pan). Press dough into frying pan to a maximum depth of 1 inch and cook flat over moderate heat for 8 to 10 minutes a side. (I found it a bit tricky to flip it - make sure you have a good spatula, not one of those dinky plastic camping ones...) The bannock should be cooked in 16 minutes. Don't let flames touch the pan, or the bannock will burn. To check if done, tap the bannock on each side - it is done when it sounds hollow.
- You added too much water and dough will be wet/spongy inside. Try again adding less water.
- You did not let the dough rise for at least 10 minutes in a warm place, and bannock was wet and spongy
- You cooked it too fast (burned on outside and moist on inside) or over too low a heat (very light brown on outside and moist inside
Everything I read made this sound trickier than it was - I made the bannock twice, and the first time it wasn't quite done on the inside (but still delicious), and the second time it was perfect! I think I didn't have enough heat the first time.
Picky loved it (especially smothered with Nutella) - I can see a new camp tradition starting!
During the heat wave last week, I spent some time in the air-conditioned book store looking at all the new cookbooks. I'm an addict - there is something a bout a new cookbook that I love love love - I have plenty of them already, but I'm alway s still excited about adding a new one to my collection. Cookbooks, when they are well done, are not just a bunch of recipes: they have a personality. If a recipe was all I was after, there is not a recipe in existence that I couldn't get off of the web somewhere - you just have to know what you're looking for. A cookbook, on the other hand, invites you into some one's kitchen to experience their life and family through food. I have many different styles of cookbook in my collection, and I spend time looking through them all - some have a picture on every page showing a mouth watering dish, some are just text (but these have personality just the same - I guess it's the collection and the way it is presented). The latest addition to my collection (you didn't think I could spend the better part of a hot afternoon in the bookstore without actually buying one, did you?) has more personality than many of my other cook books put together. familymeals by Maria Helm Sinskey. What gives it so much personality? I think layout has a lot to do with it - lots of family pictures, beautiful colors, a feeling of natural, homey comfort foods. I like the voice that Maria speaks in - she obviously feels strongly about local and organic foods, but she isn't preachy about it. She also promotes family and friends in the kitchen - which is something I really believe in as well, although it doesn't happen as often as I would like (I usually end up alone in the kitchen fixing dinner, for example. I always have help for baking and other snack-making, however.) I also love the selection of foods - it is the kind of food I gr ew up on - very American (I think, I'm not really familiar with labels) and comforting - and not afraid of a little butter and cream (which is both good and bad, in my book...). I also love that she has little "Try this at home" pages that show you how to make homemade ricotta cheese (I'm definitely going to do this) and raspberry jam. Ok, that being said - I've only tried a few recipes so far, and I'm not sure what I think. I made the pint-sized peach cobblers for a BBQ last weekend - Picky and her friend helped to cut out biscuit shapes to put on the tops, but Picky wouldn't touch th
 em when they finally came around (she was too busy eating my homemade frozen yogurt - I'll share this recipe soon). I thought it was pretty good, but a little bland - but then, I've never actually had a peach cobbler before. I'm sure that these things all depend on the natural flavor of the fruit - peaches have a very mild flavor anyway, and so I'm sure a peach cobbler is supposed to be subtle. It was a bit too subtle for me - although everyone else seemed to enjoy it, and they certainly looked really cut
 e. I wonder if nectarines would have a little more of the flavor I'm looking for?The other recipe I tried was the macaroni and cheese. Everyone has a recipe for this, and you would think they wouldn't be all that different - but the little things sometimes make a very big difference. I noticed first off that this recipe called for much less macaroni that I was used to (1/2 a pound), and my initial thought was: "Great! who wants 3 days worth of macaroni and cheese? My butt will thank me!" But then I noticed that the sauce part looked about the same as recipes that call for way more macaroni - in other words, "This is gonna be saucy!" Well, ok, I was willing to give it a try anyway, I was sure that, for macaroni and cheese, saucy was good. I still felt compelled to modify the recipe, however - it called for whole milk (I used 1 %), and heavy cr eam (I skipped this), and also 2 more tablespoons of butter than I actually used. Plus I put a bread crumb/cheese topping on it that it didn't call for, because that's Picky 's favorite part. It was adorable in the little ramekins (I usually make mac and cheese in a lasagna pan, for maximum crunchy topping). Anyway, even with my subtractions (and addition) IT WAS STILL CREAMY! And super saucy. Which was good, but I couldn't help but wonder at the calories loaded into that little ramekin. Not only that, I am always surprised at how much time it takes to make macaroni and cheese. I always find myself whisking the milk and flour for much longer than I want to. Maybe we get spoiled with instant mac and cheese, and we start to think of it as a "quick food", and so when we really make it from scratch, it takes more effort than we've anticipated. Or maybe not "we", maybe just "me". I don't know. Anyway, although it wa s delicious, I'm wondering if I couldn't really simplify the whole macaroni and cheese thing, although not to the point of instant. What if I take the cheese custard recipe, and add some cooked macaroni? I think I'm going to have to try this - because making a cheese custard is a snap, that takes 5 minutes to assemble.But don't think I've given up on my new cookbook! I'm still looking forward to making my own ricotta, smoking salmon, and trying a few recipes that Picky chose to see if she'll really eat them, like crispy shrimp with real lemony mayo, and ham, tomato, and cheese panini. I'll let you know how it goes.